iPhone & Android
Stereogram Go Field Manual
Recording oriented measurements, stations, samples and photographs at the outcrop, with or without a signal.
Chapter 1
About this manual
Stereogram Go is the field companion to Stereogram, the web application for structural geology analysis. The phone records oriented measurements, stations, notes, samples and photographs at the outcrop, with or without a signal.
1.1Conventions#
- Bold marks a label, button or option exactly as it appears on screen.
- Quoted text is the app's own wording, so you can search this manual for what you are looking at.
- Notes marked iOS or Android apply to that platform only, and sit with the feature they affect.
- "The web app" means Stereogram in a desktop browser.
1.2Phone or web app?#
| Task | Phone | Web app |
|---|---|---|
| Record measurements, stations, notes, samples, photos | Yes | Yes |
| Edit anything already recorded | Yes | Yes |
| Stereonet, rose, Fisher mean, best fit, intersection | Up to 200 measurements | Unlimited |
| Density contouring, fold, kinematic, transformation tools | No | Yes |
| Import CSV, Excel, FieldMove, StraboSpot | No | Yes |
| Start a sync, review conflicts and deletions (Chapter 10) | No | Yes |
| Choose an offline map area | No | Yes, then pushed to the phone |
| Add a GeoTIFF overlay | No | Yes, then pulled by the phone |
| Export a backup file | Yes | Yes |
The one rule to remember: almost every upload is started from the web app, not from the phone.
Chapter 2
Getting started
2.1What you need#
- A phone with a magnetometer. Without one, compass readings are impossible; everything else works.
- Portrait orientation only. iPad runs full-screen.
- An account is optional out of service, required to sync.
2.2First launch#
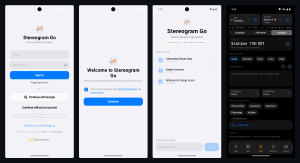
Fig 2.1Sign in, terms, project picker, and the Field tab.
Four screens, no tutorial:
- Sign in, or start without an account when there is no signal.
- Terms, accepted once per version.
- Project picker, where you create your first project.
- The Field tab, ready to measure.
2.3Permissions#
Nothing is asked at launch. Each permission is requested the first time a feature needs it. Because Field is the default tab, location is normally first.
| Permission | Asked when |
|---|---|
| Location | A tab needing position opens, or a station is saved |
| Motion sensors (iOS) | The compass first runs |
| Camera | You open the Camera tab |
| Microphone and speech | You first tap a dictation microphone |
| Add to Photos | The first photograph is kept |
Declining any of them leaves the rest of the app working; the feature that needed it says so.
2.4Appearance#
- Theme is System, Light or Dark.
- System with no phone preference falls back to dark.
- Dark is the intended field theme: readable in sun, easier on battery.
Chapter 3
Signing in
The phone uses the same account as the web app. One exception: there is no magic-link or one-time-code sign-in.
3.1The sign-in screen#
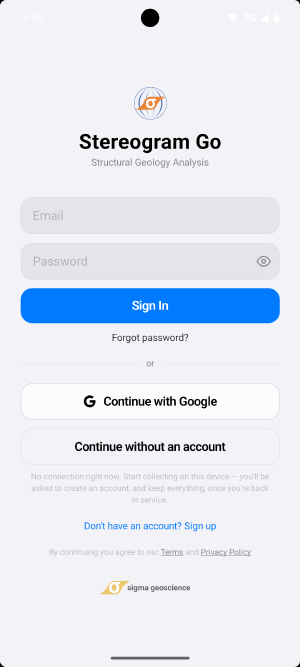
Fig 3.1The sign-in screen.
- Email and Password, with an eye icon to reveal the password.
- Sign In, inactive while either field is blank.
- Forgot password?
- Sign in with Apple, iPhone and iPad only.
- Continue with Google, both platforms.
- Don't have an account? Sign up.
- A footer linking the Terms and Privacy Policy.
3.2The three ways in#
- Email and password. A malformed address is caught before anything is sent.
- Sign in with Apple. iOS only. Cancelling returns you silently.
- Continue with Google. Opens Google in a browser sheet. On Android the tab may close first and the app finishes a moment later; a brief pause is normal.
If you originally signed up with Google or Apple, use that button. A password attempt on such an account returns "Incorrect email or password. If you originally signed up with Google or Apple, use that button below instead."
3.3Creating an account#
- Tap Don't have an account? Sign up.
- A Display name field appears and the button becomes Create Account.
- A switch offers monthly product emails, off unless you turn it on.
- An address already registered returns "An account with this email already exists — sign in instead."
- If confirmation is required, tap Keep collecting for now and start work. Everything joins your account when you sign in.
3.4Working with no signal#
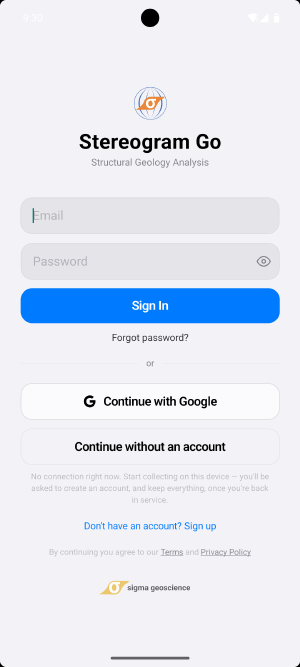
Fig 3.2With no connection, the accountless route appears.
The app probes the sign-in server every 20 seconds. When it cannot be reached, one of these appears:
| Situation | Button |
|---|---|
| Nothing recorded yet | Continue without an account |
| This phone holds an account's data | Keep working offline |
| Signed up, email not yet confirmed | Keep collecting for now |
- The offline route is never offered while the server is reachable, apart from the unconfirmed case.
- A captive portal does not count as reachable.
What works without an account: everything local. Projects, sites, stations, measurements, samples, notes, photographs, map, stereonet, automatic backup, export.
What does not: sync, photograph upload, and the plan is treated as free.
How you are reminded: an amber pill on the project picker reading No account — data stays on this device, and a matching Settings card.
Being asked to sign up happens only at a launch, or after half an hour in the background, and only when the server is genuinely reachable. A bar of signal mid-outcrop never interrupts you.
When you sign in, every record collected without an account transfers to it and is queued for sync. An alert confirms how many.
3.5Signing out with no connection#
- The app signs you out but leaves your projects open, rather than locking a season's work behind a login screen you cannot pass.
- Settings then reads Signed out — working offline. Tap to sign in and sync.
- Back in service, the sign-in screen returns titled Sign in to sync, with your address filled in and a count of changes waiting.
3.6Accepting the terms#
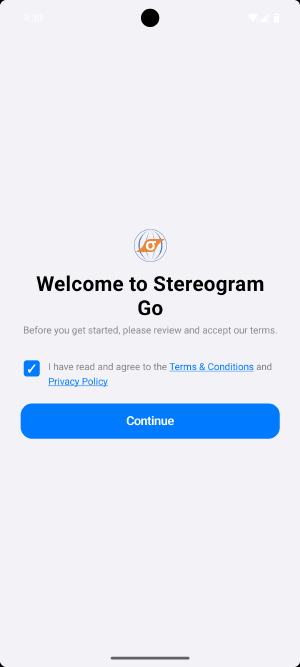
Fig 3.3Terms acceptance, box ticked.
- Tap the row to tick it, then Continue.
- Recorded on the phone at once, on the server when there is a connection.
- You are asked again only when the terms change.
3.7Resetting a password#
- Forgot password? sends a reset link.
- The link opens the web app. The phone has no password-change screen.
3.8How long a sign-in lasts#
- Phone sign-ins are long-lived; the web app's timeouts do not apply.
- Signing out on one does not sign out the other.
- With no signal the app opens your data anyway and repairs the session later.
Chapter 4
Projects and the app layout
A project is one field season, mapping area or course. The phone holds many and works on one.
4.1The project picker#
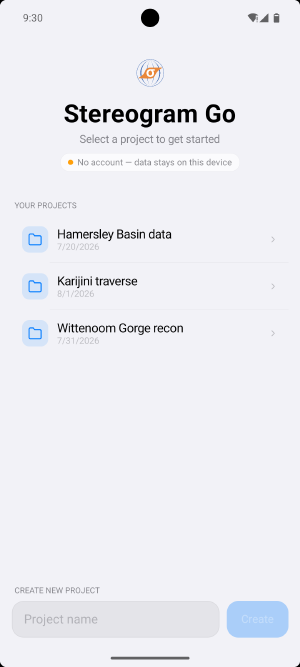
Fig 4.1Every launch begins here.
- YOUR PROJECTS lists each project with its creation date. Tap to open.
- Each project reopens on whichever tab you last used in it.
- CREATE NEW PROJECT takes a name and opens it at once. The name is sent to the web app immediately, so it appears there before any data moves.
- Long-press a row to delete it, with a warning naming the project.
4.2Switching projects#
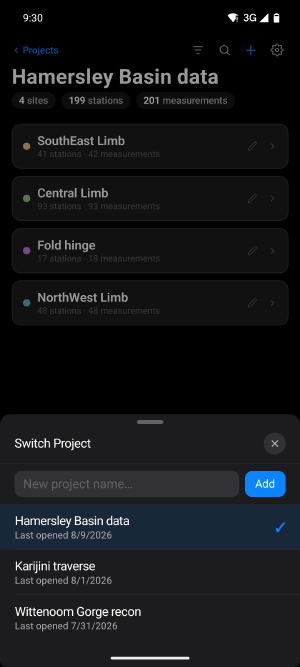
Fig 4.2The Switch Project sheet.
- Tap ‹ Projects at the top left of the Data tab.
- Rows show Last opened, most recent first, with a tick against the current one.
- A field at the top creates a project without leaving the sheet.
- You can delete any project here except the open one.
Each project remembers its own tab, expanded sites, filters, search text, stereonet selection, and map position.
4.3The tab bar#
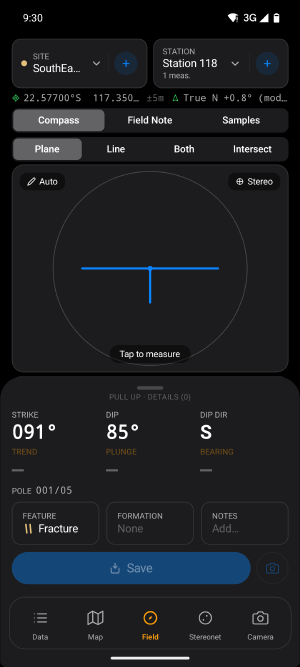
Fig 4.3The tab bar. Field is amber; the dot on Data means unsynced changes.
- The centre tab is amber whether or not it is selected, because it is the one you will use most.
- A dot on Data means the phone holds changes not yet synced. See Chapter 10.
- Tabs are frozen while you are not looking at them, which keeps the phone cool.
4.4Two screens above the tabs#
- Settings opens from the gear at the top right of the Data tab. Chapter 12 documents it.
- The photo viewer opens from any photograph and returns you where you came from. Section 9.3 covers it.
Chapter 5
Field: measuring orientations
The Field tab turns the phone into a compass-clinometer and stamps every reading with a position, a time, a declination and a quality figure.
Three pages, chosen by the selector near the top: Compass, Field Note, Samples.
5.1Layout#
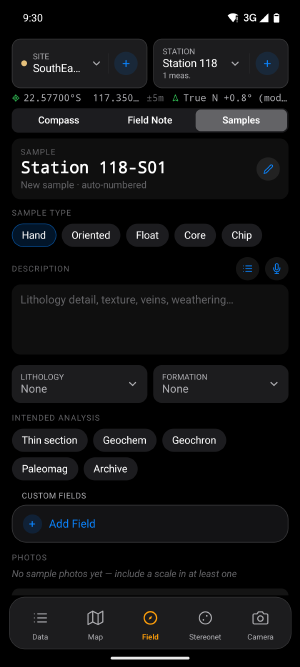
Fig 5.1The Compass page, live.
From top to bottom:
- SITE and STATION cells, each with a +.
- GPS on the left, declination on the right.
- Page selector: Compass, Field Note, Samples.
- Mode selector: Plane, Line, Both, Intersect.
- The hero card: strike view or live stereonet.
- A pull-up panel with the numbers, feature and formation buttons, notes and Save.
On a short screen the FEATURE, FORMATION and NOTES buttons move into the expanded panel.
5.2Sites and stations#
- A station is a point you stand at. A site is an optional group of stations.
- Stations with no site appear under Unsited Stations.
Creating a station. Tap + beside STATION. It is created immediately, named from your prefix and counter, so ST-001, ST-002. The counter reads existing names, so it never collides.
Coordinates come from the live GPS if the fix is under six seconds old. Otherwise the station is saved without them and the app fills them in moments later. Two alerts can appear:
- No GPS fix: no position was available. Add coordinates from the Data tab later.
- Low GPS accuracy: names the accuracy and points at Precise Location.
Other station actions
- Tap the name to rename.
- Tap the chevron to choose another, with measurement counts shown.
- A red None means no station is selected, and you cannot save.
- Typed coordinates live in the Data tab's station sheet, not here.
5.3The GPS line#
- Acquiring GPS… until the first fix.
- Then the position, in your chosen coordinate format.
- Then accuracy as ±{n}m, orange beyond 100 m.
- Precise? appears when accuracy is poor and opens phone settings.
- Location off — new stations won't have coordinates when permission is denied.
Elevation is height above mean sea level on both platforms; Android's ellipsoid height is corrected, so figures from the two are comparable.
5.4Declination#
| What you see | What it means |
|---|---|
| True N +12.3° green | From the phone's heading service |
| True N +12.3° (model) | From the built-in world magnetic model |
| True N −1.5° (manual) | The fixed value you typed |
| Mag N · resolving… grey | Auto, nothing resolved yet; readings are magnetic |
| Mag N · no dec orange | Declination off, or nothing resolved |
| Outdated | The built-in model is past its validity window |
- Set in Settings; see Section 12.4.
- In Auto the app prefers the phone's own value, falling back to the model at your position.
- It re-checks after 25 km of travel or on a new day.
- The correction eases in rather than jumping, and never touches dip or plunge.
5.5Holding the phone#
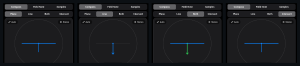
Fig 5.2The four capture modes.
| Mode | How to hold it | What you get |
|---|---|---|
| Plane | Back of the phone flat on the surface | Strike and dip, right-hand rule |
| Line | Long axis along the lineation | Trend and plunge |
| Both | Flat on the fault, long axis on the striae | Plane plus the lineation's rake |
| Intersect | Along each of two traces in turn | The plane containing both lines |
- In Line mode the reading flips by itself as you tip past horizontal.
- Intersect is for planes you cannot lay a phone on.
5.6Taking a reading#
Two ways, and the pill on the hero card always says what a tap will do.
- Tap the card. Tap to measure while live, Tap to release in red once locked. In Intersect it walks you through Line A then Line B.
- Auto. The pill reads Auto — hold steady and locks by itself once the numbers hold still for eight tenths of a second. This is the hands-free option.
There is no hold-to-lock, shake gesture or volume-button shutter.
While locked, every number is editable. Tap a value for a number pad. Strike and trend accept up to 359, dip and plunge up to 90.
5.7Reading the numbers#
| Mode | First row | Second row | Also |
|---|---|---|---|
| Plane | Strike, Dip, Dip Dir | dimmed | POLE |
| Line | dimmed | Trend, Plunge, Bearing | |
| Both | the captured plane | Trend, Plunge, Rake | pole of the plane |
| Intersect | the computed plane, green | Line A, Line B | pole of the plane |
- Strike and trend pad to three digits, dip and plunge to two.
- A lineation with no measured plunge shows a dash.
- Two parallel lines in Intersect warn Lines are parallel — no unique plane.
Display convention follows the Plane Convention setting (Section 12.4) and changes only what you see. Every plane is stored as right-hand-rule strike and dip.
| Setting | Example |
|---|---|
| Strike/Dip | 045 / 30 / NE |
| Dip/DipDir | 30 / 135 |
| Quadrant | N45E / 30 SE |
5.8The two previews#
The Stereo pill switches between them, and your choice is remembered.
- Strike view draws the map symbol, rotated so the dip tick points true down-dip relative to the phone in your hand. It fades below three degrees of dip, where strike stops meaning anything.
- Stereonet draws a lower-hemisphere equal-area net. In Both, the lineation is snapped onto the plane's great circle, where it must lie.
5.9What gets attached to a reading#
Everything here stays armed between saves and survives a restart, per project. Set it once at the start of a traverse and it follows you.
Feature — the class of thing you are measuring, carrying a name, colour and glyph that drive the map and stereonet.
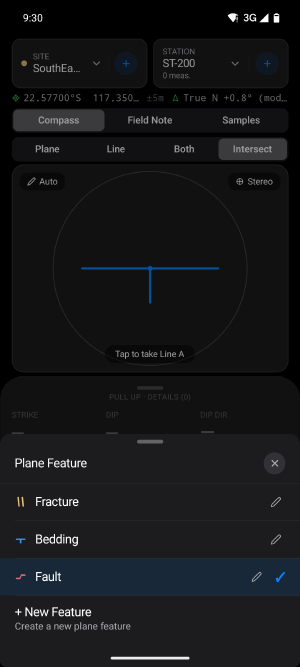
Fig 5.3The feature picker.
- Every project starts with Bedding, Fault/Shear, Lineation and Fracture.
- Features have a kind: plane, fault or line, which decides where they can be used.
- In Both, the plane picker offers only fault and shear features, and auto-selects a slickenline feature for the line.
- Choosing a fault feature in plain Plane mode does not force Both. A fault without visible striae is a perfectly good plane measurement.
Slip sense — for fault and shear features:
| Chip | Meaning |
|---|---|
| Normal | Hanging wall moves down |
| Reverse | Hanging wall moves up |
| Sinistral | Left-lateral |
| Dextral | Right-lateral |
One dip-slip and one strike-slip sense can combine, and the order you tap them is remembered and marked ① and ②, so an oblique fault records which component dominates.
Formation
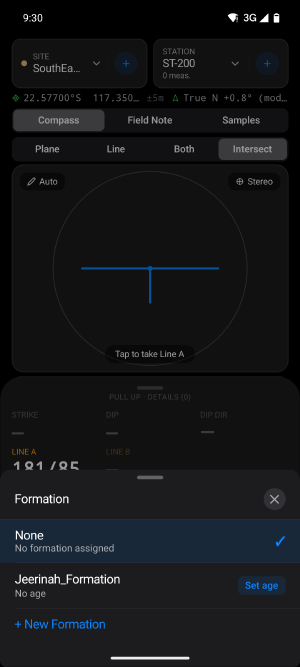
Fig 5.4The formation sheet, with ages from the geological timescale.
- Listed youngest first, each with its age and the age's conventional colour.
- + New Formation takes a name and an optional age, from eon down to epoch.
Notes — a text box with bullets and a microphone. Typing - starts a bullet; return continues the list. Notes clear after each save, since they describe that reading.
Dictation — tap the microphone and speak. A pulsing dot and Listening… show it is live. One microphone at a time. It needs an installed build.
Custom fields — your own columns, in the expanded panel:
- Text for free text, Category for a fixed coloured list, Number for a value.
- Values stay armed for the next reading, which is the point.
- Names clashing with built-in columns are rejected.
Photographs — the camera button beside Save reserves the measurement's identity, so the photograph is linked to the reading you are about to save. It is inactive until a reading is locked. Chapter 9 covers the camera.
5.10Saving#
- Save is inactive until a reading is locked, and in Both until the plane is captured.
- It shows Saving… and ignores further taps, so one tap is always one measurement.
Three alerts can stop a save: No Station, No Feature, and in Both, No Fault Feature.
Each saved reading carries the station, feature, formation, notes, custom values, quality, magnetic interference, declination and its source, the time, the position, and a measurement number.
What each mode writes:
- Plane — one plane record.
- Line — one line record. An empty plunge stores as not measured, not as zero.
- Both — a plane plus a lineation carrying the rake, numbered from its parent, so
03.1. - Intersect — one plane, marked as computed from two lines.
After a save the compass unlocks and notes clear, but feature, formation, custom values and Auto stay armed.
5.11Magnetic interference#
An orange Mag. Int. pill means the total field strength is outside what the Earth should produce.
- Usual causes: vehicles, fences, hammers, magnetic phone-case clasps.
- A case with a magnetic mount will ruin every reading you take.
- If it will not clear away from metal, the rock itself may be magnetic, which is worth noting.
- Every reading stores its quality figure, so suspect readings can be found later in the web app.
Android corrects for the phone's own fixed distortion automatically. There is no figure-of-eight dance and no calibration button.
5.12The Field Note page#
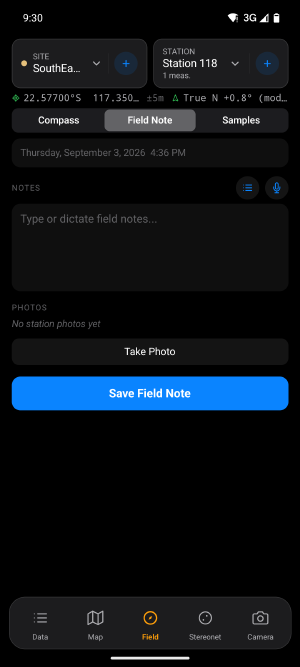
Fig 5.5The Field Note page.
For observations belonging to the place rather than to one measurement: outcrop description, access, hazards, what the unit looks like.
- Date and time, a large text box with bullets and a microphone, and a thumbnail strip.
- Save Field Note creates a new dated entry rather than overwriting.
- Entries accumulate as a journal, newest first, each stamped and marked
· editedif changed. - Each entry has a pencil and a trash icon.
5.13The Samples page#
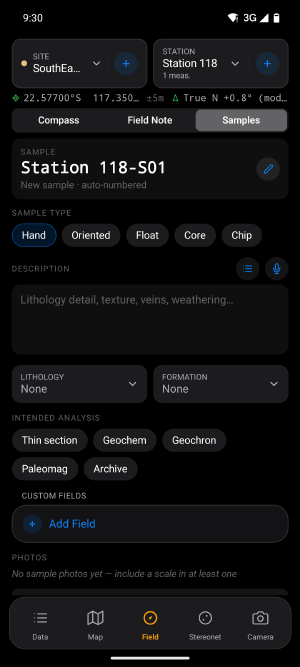
Fig 5.6The Samples page.
The only place a new sample is created. The Data tab edits existing ones.
- Auto-numbered from the station, so
ST-004-S01. - Sample type: Hand, Oriented, Float, Core, Chip.
Two types unlock extra fields:
- Oriented adds MARKED FACE, a strike, dip and way-up flag. Its Capture button reads the orientation live: "Mark strike line and way-up arrow before extraction, then hold the phone flat on the face."
- Core adds CORE AXIS, a trend, plunge, diameter and length: "Scribe a reference line, then hold the phone along the drill axis."
Other fields: Description, Lithology from 26 common rock types plus anything already used, Formation, and Intended analysis across thin section, geochem, geochron, paleomag and archive.
- Take Photo attaches a photograph to the sample. The empty state reminds you to include a scale.
- Save Sample writes it; the + beside it starts another carrying the same type, lithology, formation and analyses, which is what you want when bagging a suite.
- Samples belong to a station. Deleting one leaves its photographs behind.
- Section 6.8 covers reviewing and editing them later.
5.14Worth knowing#
- The screen can sleep while you measure. The app holds it awake only during a sync.
- No haptic feedback on lock or save. Watch the pill, or use Auto.
- Sensors run only while the Field tab is in front. A phone running its magnetometer all day gets hot and flat.
Chapter 6
Data: browsing and editing
The project's table of contents. Everything recorded appears here and can be edited or deleted.
6.1How the data is arranged#
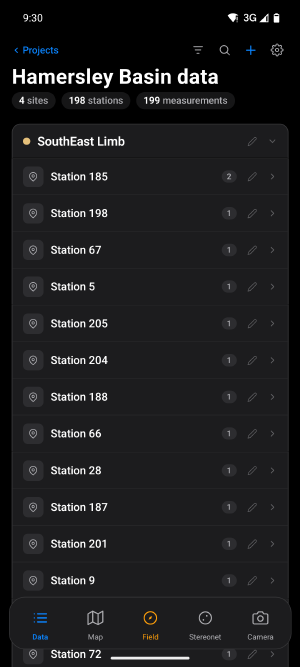
Fig 6.1The Data tab with a site expanded.
Project
└── Site                      optional grouping, has a colour
    └── Station               the point you stood at
        ├── Notes             dated field-note entries
        ├── Photos            thumbnails
        ├── Samples           bagged specimens
        └── Measurements      planes and lines
└── ↓ lineation a slickenline attached to its plane- Stations belonging to no site appear under Unsited Stations.
- A project with no sites lists its stations flat.
- Features, formations and custom fields exist project-wide and are managed inside the sheets that use them.
6.2The header#
- ‹ Projects opens the project switcher.
- Four buttons at the top right:
| Button | Does |
|---|---|
| Filter | Opens Filter & Sort, with a badge counting active filters |
| Search | Opens the search bar; closing clears it |
| Plus | Add New: a Site or a Station |
| Gear | Opens Settings |
- Three pills count sites, stations and measurements. Once anything is filtered they collapse into Showing {n} of {m} with a Clear All pill.
- Search matches site and station names, feature names, notes and the formatted attitude, so searching
045/30finds the reading itself. - Pull down to reload from the phone's database.
6.3Sites#
- A row shows its colour, name, and when collapsed {n} stations · {m} measurements.
- Tap to expand. Expanded sites end with an Add Station row.
- The pencil, or long-press then Edit, opens a sheet with a name and ten colours.
Deleting a site asks what you mean:
| Button | Effect |
|---|---|
| Cancel | Nothing |
| Delete Site Only | Stations survive and become unsited |
| Delete All | Site, stations, measurements, photographs, notes and samples |
The message names the scale first, so you know what you are about to lose.
To move a station between sites, open it and change its SITE. There is no drag and drop.
6.4Stations#
A row shows a pin, the name, a measurement count, and badges for notes, photographs and samples, each a shortcut. A station without coordinates carries an orange No GPS fix chip.
Expanded, you get a Notes row, a Photos row with up to four thumbnails, a Samples row, then the measurements.
Long-press a station for Edit, Add Measurement, Copy Coordinates, Open in Maps… and Delete.
- Copy Coordinates copies six decimals, or a UTM string, with a haptic tap and no message.
- Open in Maps… offers Apple Maps, Google Maps and Google Earth.
#### The station sheet
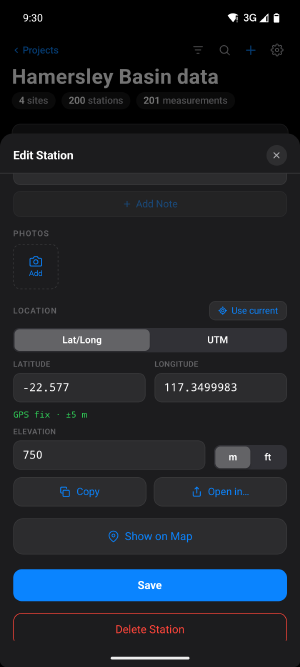
Fig 6.2The Edit Station sheet.
Sections in order: NAME, SITE, FIELD NOTES, PHOTOS, LOCATION, Show on Map.
The location section is where you type coordinates by hand:
- Use current fills them from the GPS.
- Lat/Long and UTM switch the entry format. In UTM the Zone field has an AUTO toggle.
- GPS fix · ±{n} m appears in green, or red with "too coarse to place a station".
- Typing a coordinate clears the stored accuracy, because it is no longer a GPS figure.
- Elevation has a metres and feet toggle that converts as you switch.
- Latitude beyond ±90 and longitude beyond ±180 are rejected.
Deleting a station names the cost first: how many measurements and photographs go with it.
6.5Measurements#
A row shows its number, the feature glyph in its colour, the feature name, any slip-sense chip, note and photo badges, and the value. A lineation attached to a plane is indented and prefixed with an arrow.
- Tap to open the editor.
- Long-press to delete, with the value shown so you can see what you are removing.
- Deleting a plane also deletes its lineations.
#### The Edit Measurement sheet
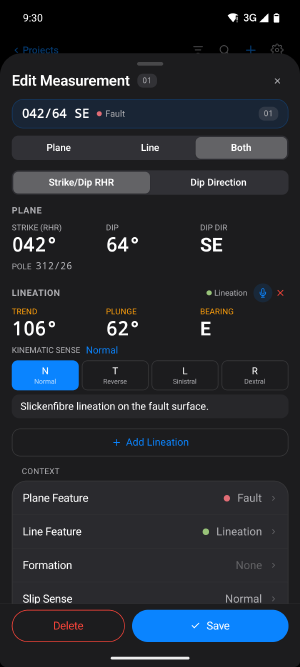
Fig 6.3A fault with its slickenline, rake and kinematic sense.
- Type: Plane, Line or Both. Plane types add Strike/Dip RHR or Dip Direction, which decides what the first field means.
- The numbers are all tappable. Clearing a lineation's plunge stores it as never measured, which is what you want for a paleocurrent.
- KINEMATIC SENSE chips appear for faults: N normal, T reverse, L sinistral, R dextral. The two dip-slip senses exclude each other, as do the strike-slip pair.
- Both splits the sheet into a PLANE block and one LINEATION block per line, each with its own feature, notes, sense and numbers, plus Add Lineation.
- CONTEXT holds Feature, Formation, Slip Sense, Position and Show on Map.
The Position row is worth understanding:
- A reading with its own fix shows coordinates; one without reads From station.
- Use Current Location gives it a fix of its own.
- Use Station Position throws that fix away.
- There is deliberately no typed coordinate entry per measurement. A reading either has a real fix or inherits one.
Delete needs two taps, becoming Confirm before it acts.
#### Features
Created from + New Feature… inside any feature picker.
- A FEATURE TYPE dropdown of built-in structural types fills in the name for you.
- Choosing a real type rather than Custom is what gives a measurement its proper map glyph.
6.6Filtering and sorting#
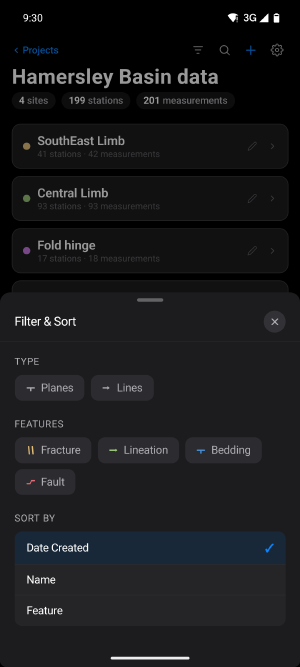
Fig 6.4The Filter & Sort sheet.
- TYPE: Planes, Lines.
- FEATURES: one chip per visible feature.
- SORT BY: Date Created, Name, Feature.
Filters are global: they also apply to the Map (Chapter 7), the Stereonet (Chapter 8) and the layers drawer. The sort is local to the Data tab. Active filters appear as removable chips.
A feature can also be hidden entirely, which removes it from every view. Clear All does not un-hide it; that is a separate switch, deliberately.
6.7Field notes#
- A station's notes are a series of dated entries, not one text box. Section 5.12 covers writing them in the field.
- Each is stamped, marked
· editedif changed, and carries a pencil and trash icon. - The composer always starts empty and always writes a new entry.
- Text left in the box when you tap Save is added too, so nothing typed is silently discarded.
- Typing
-or*starts a bullet; return continues the list.
6.8Samples#
The Data tab reviews and edits samples but does not create them: "No samples at this station yet — bag one from the Field page." Section 5.13 covers bagging one.
- Cards show name, type, collection date, intended analyses and orientation.
- The editor holds everything the Field page captured, plus a pencil to rename.
- Delete takes two taps and leaves the sample's photographs on the station.
6.9What the Data tab does not do#
- No swipe actions on rows.
- No multiple selection or bulk editing.
- Deletions cascade where they must: a site can take its stations, a station its measurements and photographs, a plane its lineations.
The only bulk selection in the app is the layers drawer on the Map and Stereonet tabs (Section 8.1), and those checkboxes choose what is drawn, never what is deleted.
Chapter 7
Map
Your stations and their structural symbols on a base map that works offline once the tiles are on the phone.
7.1Base layers#
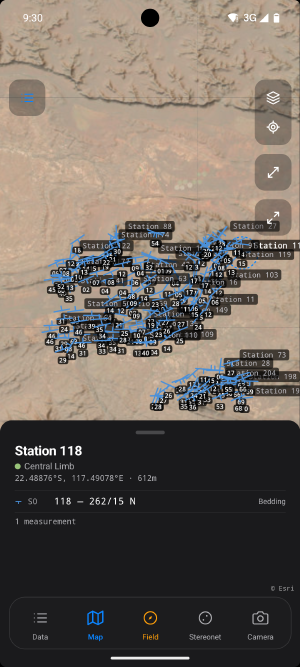
Fig 7.1198 Hamersley stations, fitted.
The map is a stack, not a list of alternatives. Any number can be on at once, each with its own opacity, and order decides what draws on top.
| Layer | Source | Detail limit |
|---|---|---|
| Satellite | Esri World Imagery | High |
| Hillshade | Esri World Hillshade | Medium |
| Esri World Topo | Esri | High |
| USGS Topo | Esri, United States only | Lower |
| OpenTopoMap | OpenTopoMap | High |
The default is satellite at half opacity over hillshade at full: imagery with topography showing through. Worth keeping, because it reads terrain and outcrop at once.
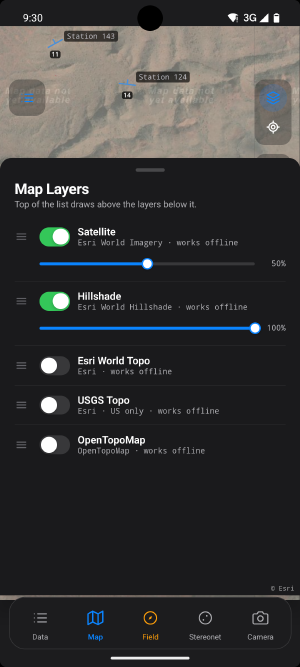
Fig 7.2The Map Layers sheet.
Each row has a drag handle for order, a switch for visibility, and an opacity slider.
7.2Moving around#
| Gesture | Effect |
|---|---|
| One finger | Pan |
| Two fingers | Zoom |
| Tap a symbol | Select the station and open its sheet |
| Tap empty map | Close the sheet |
- The map is always north-up, so the north arrow is a reminder, not a control.
- A scale bar sits beside it, in metric or imperial per your setting.
Right-hand toolbar, top to bottom: layers, my location, measure between two stations, and fit all stations. The buttons are icons without labels.
- My location shows a blue dot with an accuracy circle and stays on until turned off. There is no heading cone and no live coordinate readout.
- Fit all stations returns to the opening view. Position and zoom are remembered.
- Stations cannot be created from the map. Create them on the Field tab (Section 5.2), where the GPS runs at full accuracy.
7.3What is drawn#
| Thing | Drawn as |
|---|---|
| Station | A small blue dot, when nothing else sits at its coordinates |
| Plane | A strike line with a dip tick on the correct side, rotated to true strike, dip printed beside it |
| Lineation | An arrow pointing down-plunge |
| Plane with slickenline | The plane symbol plus an arrow in the lineation's colour |
| Photo pin | An orange ring with a camera glyph |
| Sample pin | A purple specimen tag |
| Offline area | A dashed blue rectangle |
- Symbols are drawn at constant screen size, so they stay legible at any zoom.
- One symbol per distinct position. Readings sharing a station's coordinates collapse to the dominant one; readings with their own fix spread along the outcrop, which is the picture you want.
- Photo and sample pins are optional, switched on in the layers drawer (Section 8.1). A pin borrowing its station's position is dashed, with a leader line back and a fan so each stays tappable.
- Translucent wedges on photo pins show which way the camera pointed.
At high station counts the map thins symbols rather than slowing: labels drop first, then nearby markers merge into numbered bubbles counting stations. Zoom in to separate them.
7.4The station sheet#
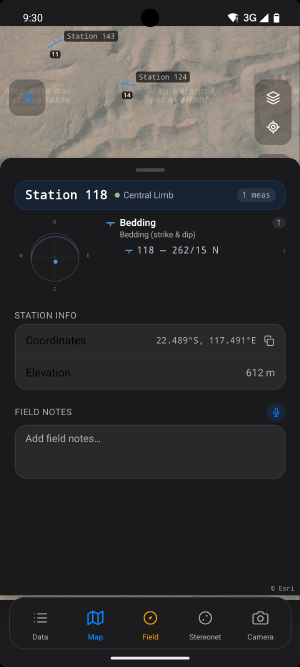
Fig 7.3The station sheet expanded.
Tap a station to open at peek height; tap the content or flick up to expand.
Peek shows name, site, coordinates, elevation, up to three measurements, a photo chip and a note preview.
Expanded adds:
- A mini stereonet of everything at the station. Tapping it selects exactly these readings on the Stereonet tab and takes you there, which is the fastest route from "what am I looking at" to "what does it mean".
- A breakdown by feature, every reading tappable straight into the editor.
- STATION INFO: coordinates, elevation, observation date. Tap to copy; long-press for Copy lat, long, Copy UTM and Open in….
- PHOTOS with thumbnails and View all.
- FIELD NOTES, the same dated journal as the Data tab, saved as a new entry when the box loses focus.
- Overlay Layers, when the project has any.
7.5Measuring between two stations#
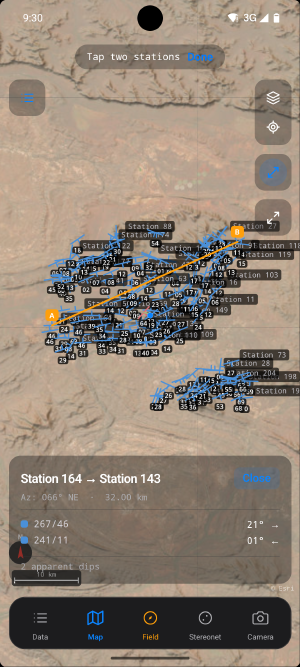
Fig 7.4Measuring between two stations 32 km apart.
- Tap the third button in the right-hand toolbar. The banner reads Tap two stations.
- Tap one station, then another.
The map draws an orange line between them, tagged A and B, and a panel gives you:
- The two station names, as {A} → {B}.
- Az: the bearing between them, its cardinal direction, and the distance.
- Every plane measured at either station, listed as strike and dip, each with its apparent dip along that line and an arrow showing which way it dips relative to it.
- A count, {n} apparent dips.
Tapping a third station starts a new pair. Done on the banner, or Close on the panel, ends it.
7.6Offline maps#
- On the phone there is no picker, no progress bar and no cancel. What you see is the dashed outline appearing once tiles land.
- Tiles are shared between projects, so an area downloaded once serves every project covering it.
- They are stripped from backup files, so a backup stays small.
- When offline, an Offline pill appears and the map draws OpenTopoMap only. Switch that layer on before you go out of signal, and check your downloaded area covers where you are going.
7.7GeoTIFF overlays#
Your own georeferenced raster: a scanned map, an aerial photograph, a geophysical image. Prepared in the web app, which stores it in the cloud drive you connected there.
- A small batch downloads silently; otherwise Download map overlays? names the size.
- Not now holds off until the next launch.
Status suffixes in the layers sheet: a percentage, waiting…, not downloaded, error, or deleted in Drive when the file has gone from your drive. Section 13.7 covers what to do.
Control it like any layer: switch, opacity, drag to reorder. The pencil deletes it from the project on all your devices, without touching the original in your drive.
7.8Location on the map#
- Requested the first time any tab needing position opens.
- The GPS runs at highest accuracy while the Map tab is in front, dropping back when you leave.
- Deny it and the map still works as a map; My location simply does nothing.
Chapter 8
Stereonet and rose diagram
Plots what you have collected, so the structure emerges while you are still standing on it. Two pages: Stereonet and Rose. Swipe between them or use the selector.
8.1Choosing what is plotted#
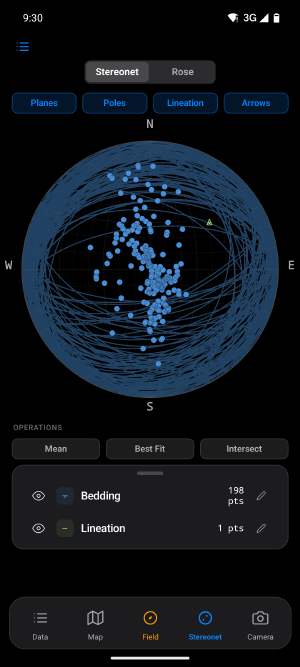
Fig 8.1198 bedding poles, forming a girdle.
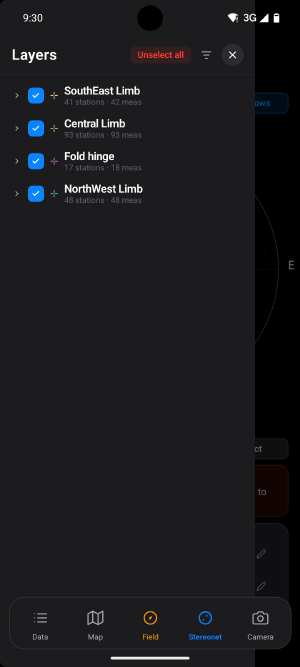
Fig 8.2The Layers drawer.
The plot draws measurements ticked in this tab's own selection, which is separate from the map's. A new project starts with everything ticked.
- Tap the list icon to open Layers: sites, stations, then measurements, each with a checkbox.
- Ticking a station ticks everything at it.
- Select all and Unselect all sit in the header.
- Each measurement row shows its value, so you can pick out an individual reading.
- The chevron jumps to the Data tab with that measurement open.
A slickenline whose plane you did not tick still brings its plane along, because a rake without its plane means nothing.
Three other things decide what appears:
- A feature hidden project-wide never plots.
- The global filters apply here as everywhere (Section 6.6).
- The legend's eye hides a feature from this tab alone.
An amber strip tells you when something is held back, with a Clear link.
8.2The stereonet#
The projection is equal-area, lower hemisphere, with a ten-degree grid. None of that is adjustable. Equal-area is right for structural work because it does not distort the density of points, which is usually what you are looking at.
| Button | Draws |
|---|---|
| Planes | Great circles in feature colour |
| Poles | Poles to planes, filled |
| Lineation | Line measurements, hollow. A slickenline snaps onto its plane |
| Arrows | Slip arrows for lineations carrying a slip sense |
All four are on by default. The plot is a picture, not a control: no tap-to-identify, no zoom, no rotation. Use the Layers drawer to find out which point is which.
8.3Operations#
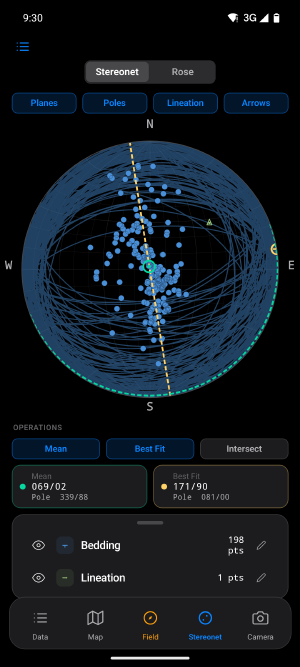
Fig 8.3Mean and Best Fit, with their result chips.
Three buttons below the plot, each drawing its result and adding a chip.
- Mean — the Fisher mean of everything plotted, treated as axial, which is correct for orientations where a pole and its opposite mean the same thing. Drawn green.
- Best Fit — the best-fit plane through all plotted vectors, drawn yellow. Applied to bedding poles around a fold this is the pi-girdle, and the pole it reports is the fold axis. That is the classic construction, available in the field the moment you have enough readings.
- Intersect — the line where two planes meet, drawn indigo, reporting the dihedral angle and the intersection's trend and plunge. With more than two planes ticked, the chip opens Select 2 Planes. Parallel planes report Parallel — no intersection.
Lineations with no measured plunge cannot take part in Mean or Best Fit, and a grey chip says how many were left out.
8.4The rose diagram#
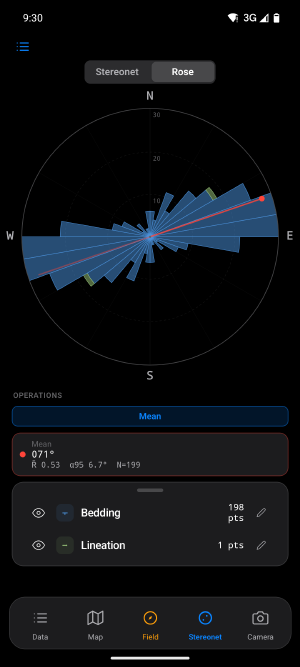
Fig 8.4The rose with its mean vector.
- Full 360°, axial, ten-degree bins. Every azimuth counts in its own bin and the one opposite, which is correct for strikes and for non-directional lineations.
- Planes contribute their strike, lines their trend.
- Trend-only lineations count here even though they cannot appear on the stereonet.
- Petals stack by feature; three dashed rings are labelled with counts.
Its single operation, Mean, reports the mean azimuth, the mean resultant length R-bar, the confidence interval alpha-95 and the count N. This is the only place in the app those statistics appear.
8.5The legend#
- The eye hides a feature from this tab only, keeping its count visible.
- The swatch or pencil opens ten colours. Changing one changes it everywhere in the app and syncs, so use it to bring a project's colours into line rather than as a local view setting. Features themselves are edited from Section 6.5.
- Tapping the row opens Custom Fields for that feature, summarising your columns across the ticked measurements. Agreement shows the value; disagreement shows Mixed. A quick way to check a traverse was tagged consistently.
8.6Getting the plot out#
There is no export, share or save-image button. Use a screenshot for a quick record, and the web app for anything you intend to publish.
8.7Left to the web app#
Density contouring, equal-angle projection, upper hemisphere, net rotation, half roses, adjustable bin sizes, colouring by anything but feature, and the full statistical readout on the stereonet page. The phone ships the subset you need at the outcrop.
Chapter 9
Camera and photos
Every photograph is stamped with where you were, which way you were pointing and how steeply, and is attached to a station and often to a specific measurement. That is what separates it from a photograph in your camera roll.
Two modes on one screen: the Camera viewfinder and the Library grid.
9.1The viewfinder#
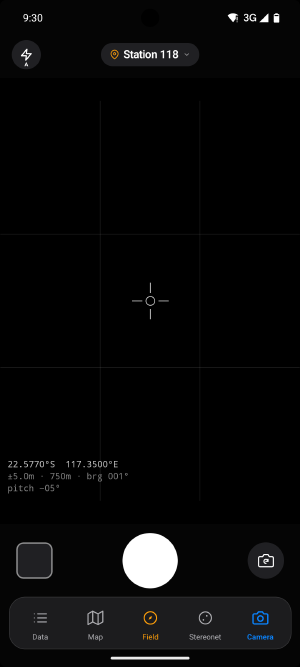
Fig 9.1The viewfinder with its sensor strip.
Top bar:
- Flash, cycling on, off and auto.
- The station badge, showing which station the next photograph joins. Tap to switch; the picker shows photo counts and offers + New Station.
- A return pill when you arrived from another screen.
- A linked-measurement banner when you arrived from a measurement, with an X to drop the link.
The frame is 3:4 portrait, showing exactly what will be saved, with a permanent rule-of-thirds grid and centre crosshair. Pinch to zoom.
The sensor strip is the point of the screen. Live, it shows:
- Your position, or Acquiring GPS…, or Location off.
- Accuracy, altitude and the camera bearing, which reads
---°when the phone points within about five degrees of straight up or down, where a bearing is meaningless. - Pitch, how far above or below the horizon the lens is aimed.
The bearing obeys the same declination setting as the compass, so a photograph's bearing and a measurement's strike share a reference frame.
If the project has no stations, the shutter refuses with No Station.
9.2Reviewing each shot#
Every shutter press opens the photograph full-screen before it stays.
- Blue tick keeps it. This is when the camera-roll copy is made and the upload queued.
- Red X discards it. A discarded frame never reaches your camera roll and never leaves the phone.
You can add a note and draw on it before deciding.
Recorded with each shot: station, linked measurement or sample, position, elevation, camera bearing and pitch, and the time.
9.3The photo viewer#
Tap any photograph anywhere in the app. Pinch to zoom to five times, drag to pan.
- Information shows capture time, station, location, bearing, pitch and the linked measurement. Show on Map turns on its pin and takes you there.
- The note. Each photograph carries one free-text note, with bullets and dictation. A photograph with a note carries a badge in the grid.
- Markup opens the drawing tools.
9.4Markup#
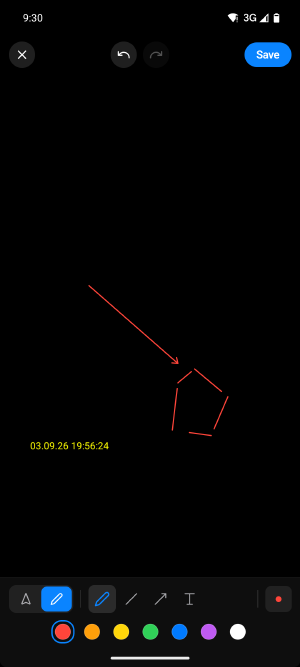
Fig 9.2The markup tools. The photograph here is an emulator test frame.
This is how a photograph becomes a figure: circle the feature, point at the contact, label the units.
- Four tools: Freehand, which smooths on release, Line, Arrow, and Text.
- Seven colours, four stroke widths, thirty levels of undo and redo.
- Navigate lets you pan and zoom without drawing.
- No eraser and no clear-all; use undo. No share button in the viewer.
9.5The library#
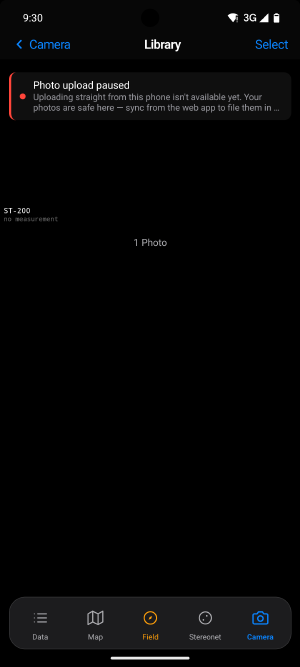
Fig 9.3The library grid.
- Pinch the grid to change density between two and seven columns.
- At three columns or fewer each cell carries the station name and linked measurement.
- Newest first. Tap to open; long-press to start a selection.
- Selection mode gives Select All, a running count and a trash button.
Deleting removes the file and record from the phone, and the deletion syncs. It does not touch copies already in your cloud drive or camera roll.
9.6Where the photographs go#
On the phone, the full-resolution file lives in the app's private storage. With Save to Camera Roll on, which is the default (Section 12.5), a copy also goes to your gallery when you keep the shot.
In the cloud, photographs are filed into the Google Drive or OneDrive account you connected in the web app. The phone never signs in to Google or Microsoft itself. Each project gets a folder and each file is named from its station and capture time.
Uploads run in the background. On iOS transfers continue while the app is suspended or closed. On Android a queued photograph waits for a connection rather than failing, and survives the app being killed or the phone rebooting.
The banner at the top of the library is where this surfaces:
| Banner | Meaning |
|---|---|
| Uploading 2 of 5 | Working through the queue |
| 3 photos waiting to upload, with Upload | Paused, will retry; tap to push now |
| Photo upload paused, "No cloud drive is connected." | Connect one in the web app |
| Photo upload paused, "The cloud drive disconnected." | Reconnect it there |
| Photos uploaded, "{n} can't be uploaded" | The record survives, the file does not |
With no drive connected nothing is lost. Photographs stay on the phone and their records still sync. A sync run from the web app (Chapter 10) asks the phone for the bytes and files them into whichever drive is connected there. Slower, but complete.
9.7What the camera does not do#
No video, burst, timer, gallery import, exposure or focus controls, and no separate caption beyond the note. The grid and crosshair cannot be switched off, and the pitch readout is the level indicator; there is no bubble.
Chapter 10
Syncing with the web app
10.1The short version#
- The phone's only sync indicator is the dot on the Data tab, meaning changes not yet uploaded.
- The one thing the phone does by itself is announce a new project, so a project created at the outcrop appears in the web app's list before any data moves.
10.2What you do#
- Have the phone signed in, online, and the app open. Any screen will do.
- Open the project in the web app.
- Run the sync there. It asks the phone what it has and asks you to approve what comes across.
- Watch progress in the browser.
The phone holds its screen awake during a sync, so it can still answer when the web app asks for photograph bytes minutes in. Put it down, leave it unlocked, let it finish.
10.3What the sync does#
Not needed to use the app, but it explains a few behaviours.
- Local changes go up before server changes come down, parents first, so a station always arrives before its measurements. Deletions go the other way.
- Your unsynced edits are never overwritten. A clash is reported back to the web app and reviewed in the browser, not in the field.
- A failed record does not block the rest. A failed batch retries one record at a time.
- Deleting is careful. Records deleted on the server go to a local holding area for a week before purging, and anything you edited locally is exempt.
- Two phones on one account both work. Each answers with its own identity.
10.4What does not sync#
| Photograph files | Records sync; image files travel separately. See Section 9.6 |
| Offline map tiles | Downloaded per phone, never uploaded, stripped from backups |
| Overlay downloads | The definition syncs; the raster is fetched per device |
| Per-device view settings | Layer opacity, map position, stereonet selection |
| Derived and analysis data | Web app only |
10.5With no signal#
Nothing about collecting requires a connection. Everything is written to the phone first, and the pending dot stays lit until you are back in service.
Chapter 11
Backup, export, and your account
11.1Automatic backup#
- Writes a
.strgrfile holding the whole database, every project, with offline map tiles stripped so it stays small. The switch is in Section 12.3. - Runs a minute after you stop making changes, and immediately when the app goes to the background.
- Keeps the two most recent files.
| iOS | Creates a Stereogram folder, visible in Files under On My iPhone › Stereogram Go. Nothing to set up |
| Android | Asks you to choose a folder the first time. Until you do, auto backup is on but writing nothing |
If you have an Android phone, open Settings now and check the row reads "Saving to" a folder you recognise.
- Working: Last backup: with the time.
- After two consecutive failures: Backups are failing: in orange. A single hiccup is not reported, so that line means something real.
11.2Exporting by hand#
- Settings › BACKUP › Export to Files writes the same file to your share sheet.
- Named after the open project, though it contains every project on the phone.
- Do this at the end of a field day with no signal. It is the offline equivalent of a sync.
11.3Restoring#
To recover onto a replacement phone: restore in the browser, then sync down. Plan trips knowing the backup is an insurance policy you claim on a desktop.
11.4Your account#
| Profile card | Meaning |
|---|---|
| Your email address | Signed in normally |
| No account | Collecting without one |
| Your email, "Signed out — working offline" | Signed out with no connection, data still open |
Monthly Update Emails appears only when signed in and controls one thing: a monthly product email. Account and security emails are always sent.
11.5Signing out#
- Tap the profile card or the Sign Out row, and confirm.
- With a connection: back to sign-in, and the phone forgets which account owned its data, so the next person to pick it up finds nothing.
- With no connection: the careful path in Section 3.5, which keeps your projects open.
Signing out on the phone does not sign you out of the web app.
11.6Deleting your account#
Delete Account asks twice: "This permanently deletes your account, all synced projects, and photos metadata from our servers. Data stored only on this device is not affected. This cannot be undone."
Two things to note:
- Data that never left the phone survives, because it was never on the servers.
- Photographs already filed into your own Drive or OneDrive stay there. They are in your storage.
Chapter 12
Settings reference
Open from the gear at the top right of the Data tab. Sections appear in screen order.
12.1Profile#
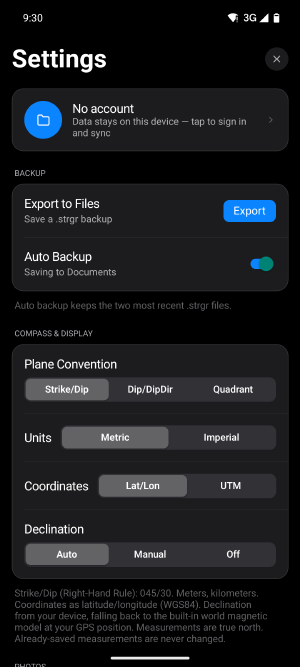
Fig 12.1Profile, email updates and backup.
The card at the top, in one of three states (Section 11.4). Tapping it offers to sign out (Section 11.5), or to sign in, depending on where you stand.
12.2Email updates#
Visible only when signed in.
| Setting | Options | Default |
|---|---|---|
| Monthly Update Emails | On, off | Off |
12.3Backup#
| Setting | Control | Default |
|---|---|---|
| Export to Files | Export button | — |
| Auto Backup | Switch | On, but Android asks for a folder first |
Chapter 11 covers both, and why the Android folder matters.
12.4Compass and display#
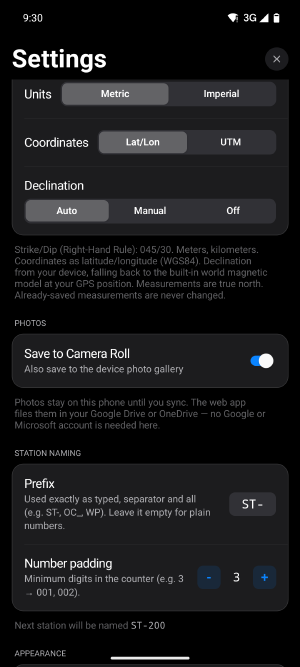
Fig 12.2Compass and display settings.
| Setting | Options | Default | Effect |
|---|---|---|---|
| Plane Convention | Strike/Dip, Dip/DipDir, Quadrant | Strike/Dip | How planes are displayed. Stored data unchanged |
| Units | Metric, Imperial | Metric | The map scale bar and cross-section distances. Station elevations keep the unit they were recorded in |
| Coordinates | Lat/Lon, UTM | Lat/Lon | How positions are displayed. Both WGS84 |
| Declination | Auto, Manual, Off | Auto | Whether new readings are corrected to true north |
| Value | A number | 0 | The fixed declination, east positive. Only when Manual |
A footnote spells out your combination in words and always ends "Already-saved measurements are never changed." That is the guarantee: changing a convention never rewrites what you recorded. Section 5.4 covers declination in the field, and Section 5.7 the display conventions.
12.5Photos#
| Setting | Default | Effect |
|---|---|---|
| Save to Camera Roll | On | Also writes each kept photograph to your gallery. See Section 9.6 |
12.6Station naming#
Stored per project, so one project can use ST- and another OC_.
| Setting | Default | Notes |
|---|---|---|
| Prefix | ST- | Used exactly as typed. Up to 16 characters; illegal file-name characters are removed as you type, because station names become photograph folder names |
| Number padding | 3 | Minimum digits. Between 1 and 6 |
Changing the separator does not restart the counter, so switching ST- to ST_ continues where you were. Section 5.2 covers creating stations.
12.7Appearance#
| Setting | Options | Default |
|---|---|---|
| Theme | System, Light, Dark | System |
12.8Legal and support#
Privacy Policy and Terms of Use open in your browser. Contact Support opens a message to info@sigmageoscience.com.
12.9What is not in Settings#
No sync section, no restore, no cloud-drive connection, no plan or billing, no version number. Sync, drive connection and restore are web-app actions, and there is no paywall on the phone.
Chapter 13
Troubleshooting
13.1The compass reads wrong#
- Check the declination line first. Mag N means readings are magnetic, which in much of the world is several degrees off true north. Section 5.4 explains the readout.
- Look for the Mag. Int. pill. Step away from vehicles, fences and hammers. A magnetic phone-case mount will ruin every reading and is the commonest cause.
- Check you are holding the phone as the mode expects. Plane measures the screen plane; Line measures the long axis.
- Compare against a real compass once, at the start of a project. That single check tells you whether you have a declination problem, a case problem, or no problem.
13.2Stations all land on the same spot#
Your phone is giving a coarse position. On iOS this is almost always Precise Location being off: Settings › Privacy › Location Services › Stereogram Go.
13.3A station or reading has no coordinates#
Saving never waits for the GPS, so a reading taken before the first fix is stored without one and filled in later. If none arrives, the station shows an orange No GPS fix chip and you can type coordinates in the station sheet (Section 6.4).
13.4The map is blank or will not zoom in#
- Offline? The map draws OpenTopoMap only. Switch that layer on.
- Layer stack? Detail is capped by the least detailed visible layer (Section 7.1). Turn Hillshade and USGS Topo off for maximum sharpness.
- Area downloaded? The dashed blue outline shows what you actually have.
13.5The stereonet is empty#
- Nothing ticked: tap the list icon and select measurements.
- More than 200 ticked: a red box names the count. See Section 8.1.
- Also check the legend's eyes and your global filters.
13.6Photographs are not reaching my cloud drive#
Read the banner at the top of the library; it names the reason (Section 9.6). Nothing is lost while uploads are blocked. The images sit on the phone, and a sync run from the web app collects them.
13.7An overlay will not download#
Overlays come from your own cloud drive by way of the web app, so the web app must be open in a browser the first time. Deleted in Drive means the file is gone; repair it there and the phone retries.
13.8Android auto backup is doing nothing#
On by default, but writes nothing until you grant a folder (Section 11.1). Check the row says "Saving to" a folder you recognise; if it says "Save automatically when data changes", switch it off and on and choose one.
13.9I signed out with no signal and cannot get back in#
You do not need to. The app keeps your projects open and says so. See Section 3.5, and Section 11.5 for signing out generally.
13.10The app is asking me to create an account#
You have been collecting without one. Your data is safe and joins your account when you sign in. Section 3.4 explains the accountless route.
13.11The phone is hot, or the battery is draining#
- Field, Map and Camera use the sensors and GPS at full rate. Parking on the Data tab between outcrops helps.
- Dark theme helps on an OLED screen.
- During a sync the app deliberately holds the screen awake; that ends when the sync does.
Chapter 14
Glossary
Alpha-95. Radius of the 95% confidence cone around a mean direction. Reported on the rose.
Apparent dip. The dip of a plane as it appears in a section not perpendicular to its strike. Always shallower than the true dip.
Auto. Hands-free capture: the reading locks once the numbers hold still.
Axial data. Orientations where a direction and its opposite mean the same, as strikes and most lineations are.
Best fit. The plane best containing a set of vectors. Around a fold it is the pi-girdle, and its pole is the fold axis.
Declination. The angle between magnetic and true north at your position.
Dip. The steepest angle a plane makes with horizontal, 0 to 90.
Dip direction. The compass direction of steepest descent, 90° from strike.
Equal-area projection. The Schmidt net, which preserves point density. Always used here.
Feature. A named, coloured class of measurement. Called a dataset in the web app.
Fisher mean. The mean direction of a set of orientations, with a measure of clustering.
Formation. A named rock unit, optionally tied to a geological age.
Intersection line. Where two planes meet.
Pole. The line perpendicular to a plane. Plotting poles is what makes a cluster or girdle visible.
Rake. The angle of a line within its plane, from a strike end. What Both mode records.
Right-hand rule. Strike quoted so the plane dips to the right of it. How every plane is stored.
Site. An optional grouping of stations.
Slickenline. A lineation on a fault surface recording movement direction.
Slip sense. Normal, reverse, sinistral, dextral, or an oblique combination.
Station. A point you stood at. Everything else hangs off one.
Strike. The compass direction of a horizontal line in a plane.
Trend and plunge. The direction a line points down, and how far below horizontal.
.strgr file. The backup container, holding the whole device database.